
The Wait Until API Event Activity is a new Journey Builder activity released as part of the April 2021 Salesforce Marketing Cloud Release. It allows you to create a real-time experience for contacts by allowing an external event to trigger an action mid-journey. You can add the Wait Until API Event activity at any point inside your journey and when your customers reach that point in the journey, they will be held until an event occurs, before moving to the next activity in the journey. This activity has a mandatory split into two paths: for customers who take action and for customers who don’t, which allows you to create customized experiences for all contacts.
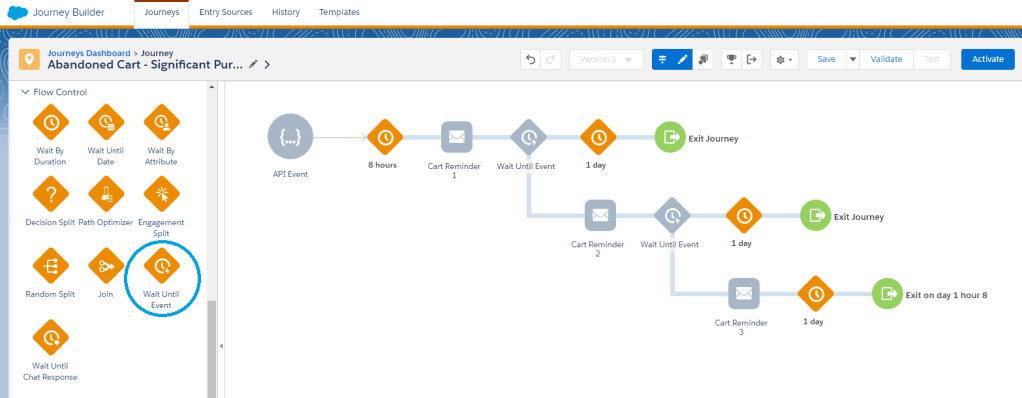
There are multiple use cases for this kind of activity, for example, moving subscribers to a different path in an abandoned cart journey when they finalize the purchase or triggering a confirmation email as soon as they take a specific action on your website. You could even get creative and use this activity to trigger an action as soon as your subscribers click on a specific link in an email you sent, which I will cover later in this article.
Configuring a Wait Until Event activity
The Wait Until Event Activity can be used in any kind of journey, and the journey doesn’t need to be triggered by an API event – the activity will work just as well in journeys with Data Extension, Salesforce, and other Entry Sources available. Configuring the Wait Until Event activity in a journey is very simple and takes just a few steps:
- Drag the Wait Until API Event activity onto the canvas. The system adds a no-event path to the canvas for contacts who don’t respond.
- Click to open the wait activity.
- Select an API event or create one.
- Click the Filter Criteria tab and set the filter criteria. You can use Contact data or Journey event data for the filter. Journey event data is the data related to the API event you chose rather than the journey’s entry source.
- Click Done.
- Click the Maximum Wait Duration tab and set the maximum number of hours or days contacts are held in this activity before taking the no-event path.
- Click Summary and review your settings.
- Click Done. Don’t forget to configure the no-event path. You can re-engage customers or have them exit the journey.
Upon creating a new API event for the Wait Until Event activity, you will be asked to choose a Data Extension – it can be either the Data Extension you are currently using for your journey or a different one. If you choose to use the same Data Extension as the one you’re using for the journey, make sure that you’re using a composite primary key or no primary key at all, as the Wait Until Event API will essentially add a duplicate record to your Data Extension each time it’s triggered.
Configuring the Wait Until Event API call
This is where it gets a little wild, as there is no technical documentation for the Wait Until Event API. The documentation redirects you to the API Event Entry Source documentation but turns out that the Wait Until Event API is exactly the same thing: you’re injecting contacts into a journey, with the only difference that they do not start from the beginning, but from the point where they were held in the Wait Until Event activity. If you’re not familiar with the API Event Entry Source and Firing an Entry Event, check out this article: Add subscribers to a Journey from a CloudPage using Fire Entry Event
For the purpose of this article, I built a simple Double Opt-In journey triggered by API:
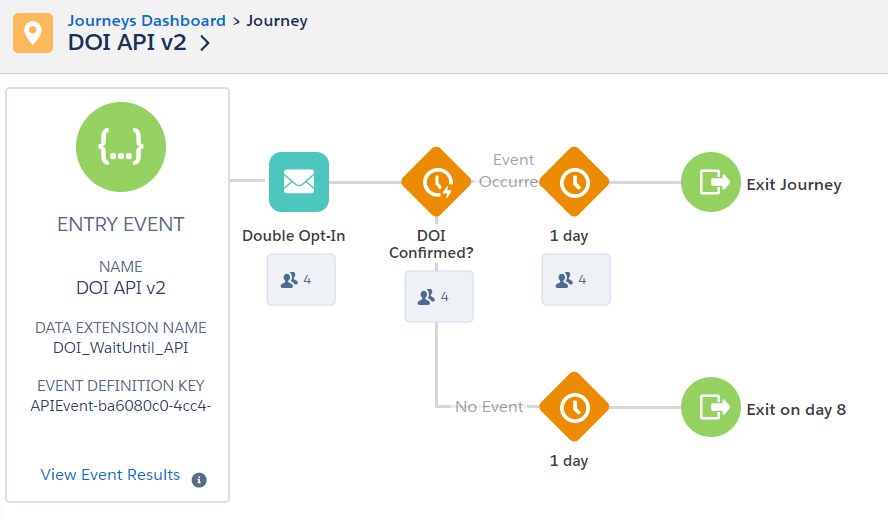
First, I would make an API call to add subscribers to the journey. They would also be added to the journey’s Data Extension, where I was passing just two parameters – their email address and their DOI status, which in this case, was false:

As mentioned earlier, I did not have a primary key in my Data Extension, which allowed for a duplicate record to be added to the Data Extension with a different DOI status when the API call was made:
This turned out to work very well and the contacts were immediately released from the Wait Until Event activity.
Other use cases for the Wait Until Event activity
Another use case that came to my mind was using this new activity instead of an Engagement Split inside a journey. When working with Engagement Splits, you need to set a specific wait time after which the journey will check whether the contact clicked on a link in the email or not. The Wait Until Event activity would allow you to take an action immediately after someone clicks on the link, without having to wait until the pre-defined amount of time passes.
To make that happen, I have created a CloudPage which serves the sole purpose of making the API call to release the contact who clicked on a link from the Wait Until Event activity and then redirects the contact to the target website. Instead of including a static link in your email, eg. http://www.salesforce.com, use the CloudPagesURL function to direct your subscribers to the CloudPage first, and include your link in a Redirect function at the end of the CloudPage. The contact clicking on the link doesn’t see any difference, as the redirect happens instantly and they are taken directly to the target page, and in the background, the contact gets released from the Wait Until Event activity and the journey continues. Here is the code I used on the CloudPage:
When creating the CloudPage, remember to include the credentials of the Installed Package and in the payload of the call made to the Wait Until Event activity make sure to include all the data required in the Data Extension you’re using as well as defined in the filter inside the Wait Until Event activity.
Questions? Comments?
Leave a comment below or email me at zuzanna@sfmarketing.cloud.

Thanks for sharing. Very helpful. This is going into my collection.
LikeLike
Hi, Zuzanna! Thank you SO much for sharing this article. I now have a better understanding of how to use the Wait Until API activity. I have a question: would you happen to know how to use this activity to check a field on a standard sobject such as the Opportunity object?
Use case: A contact needs to receive an email reminder to renew their services for another year. The entry event in the journey checks that the field date is before todays date. An email reminder is sent to the contact. Then we add the Wait Until API event which will check the Salesforce field to see if the field has been updated (contact has renewed their services) say after 1 week. After seeing that the field has been updated, we send a thank you for renewing email. If they have not renewed, we send another reminder email.
Please let me know if this does not make sense or if a Wait Until API event is not the best approach. I appreciate your time!
LikeLike
Hi Kanesha! For this use case it would be hard to use the Wait Until API Event activity, it would require some complicated development in Sales Cloud. You should be able to fulfill this requirement much easier by synching the Opportunity object from Sales Cloud in Contact Builder and using the data from this object in the decision split (Contact Data > salesforce synched data > … > Opportunity)
LikeLike
Hello,
I am working on a similar project – would you recommend making a data relationship of the entry DE (that is a Salesforce Journey Entry Data Event DE) and the opportunity object so that you can use it in the journey or does that not matter?
Thanks
Kalina
LikeLike
Hi Zuzanna,
Unfortunately the decision split is not feasible for such use cases.
Can you think of a work around when we need something like a decision split but immediately after a Salesforce field is adapted (so no wait steps in between). So more like an API event but then for SF fields?
Many thanks!
LikeLike
Hi Zuzanna! Do you know if it is possible to use this on a confirmation link within an email, not through a cloud page? Thank you!
LikeLike
Hi Dani – unfortunately no, you cannot use this inside an email, but you can insert a CloudPage between the email and the target link to trigger the API call 🙂
LikeLike
Hi Zuzanna!
This as a great manual, thanks a lot for sharing! For my use case, I would like to trigger the call when an existing record is updated, instead of adding a new record. So I would like to update a Boolean filed from FALSE to TRUE via the API > which will then trigger the Wait Until Event activity. DO you know if that is possible?
Thanks!
LikeLike
Hi Zuzanna , I was going through a scenario on your blog post which is very similar to what we want to accomplish in our Journey.Reference link to your post:-https://sfmarketing.cloud/2021/04/29/using-the-wait-until-api-event-activity/
I am currently doing sfmc implementation in my company . I am the sole person who has working knowledge of marketing cloud and don’t have any help from peers/ team in Marketing Cloud .I do have content/html creative team and Salesforce developers working with me.
I am currently trying to design a patient feedback journey which has patients entering the journey through a “data extension” (getting refreshed through automation) entry source. Whoever enters the journey , will receive a feedback survey email which has an interactive email form block. ( 2 visible input fields- star rating & feedback comments) .One hidden field on the form ( subscriber key) .
After this email activity, the next step I am thinking of using in the journey is a Wait until event activity which will wait for anyone who submits the survey( hit submit button in the email) will move forward the “Yes” path. Else if event didn’t happen will follow “no” path.
Whoever fills the form and hit submit, their data passes through a interactive email page in a URL string and gets saved in a DE( which is attached to the interactive form )
My query is , will I be able to use this Wait Until event activity ? Since in my case I have an Interactive email page as the cloud page and not a regular landing page. If yes, how can this be done?
I have already tried creating the same journey by utilizing Wait by Duration and Engagement split activity post survey email being sent , but we wanted more real time , (whoever clicks the submit button, moves to yes path and receives 2nd email instead) instead of waiting together in the Wait by duration queue.
Any suggestion / feedback is greatly appreciable. I would be really grateful if you can throw some light on this.
Regards Prerna
LikeLike
Hola Hola Zuzanna.
Muchas gracias por tu post. ¿Sabes si se puede utilizar este método para retener a los contactos hasta que abran el mail? Realmente mi duda es como activar la llamada API con la apertura de correo. Se te ocurre algún método.
Gracias
LikeLike
Hello, This is a great article. I used the Wait until API event in my journey. But I am getting duplicate entries for single submission with the difference of 1 second in the time. There is no primary key defined in my Data extension.
Date – 2025-01-23 09:26:56.207
2025-01-23 09:26:57.187
Is there any work around for this problem?
LikeLike