
After reading this article you will be able to:
- Create a triggered email,
- Create a triggered email interaction,
- Track and log sent triggered emails,
- Personalize a triggered email,
- Trigger an email from Marketing Cloud using various methods,
- Trigger emails from Sales and Service Cloud.
Understand Triggered Sends in Salesforce Marketing Cloud
A triggered email is a message that Marketing Cloud sends to an individual subscriber in response to a subscriber action. For example, sending a confirmation message after a customer makes a purchase is a triggered email.
A triggered email has two components that you create in Marketing Cloud: content and interaction. When you define a triggered email interaction, you provide information about the message and its behaviour that the interaction uses each time it is triggered, for example: which Sender Profile and Send Classifications to use, which Publication List to use, etc.
The definition of what triggers the interaction to send the email is maintained outside of the application using API calls. The information created in the interface is used by the API when an email is triggered.
Follow the list of step-by-step instruction in this article to create and send your first Triggered Email.
Create an email for use with Triggered Sends
Let’s start by building a very simple email, without any AMPscript or personalization. Go to Email Studio > Content and create an email, just like you would with any other email created in you’re account. Triggered Emails do not have any special requirements when it comes to templates or content blocks used, content types or even where you store them – they’re just like any other emails in Salesforce Marketing Cloud’s Email Studio.

If you need help building an email from scratch, try this link: Create a Content Builder Email.
Create a Triggered Email Message Interaction
Once the email is ready, we can jump to Email Studio > Interactions > Triggered Sends and create a new interaction, which will define all of the Triggered Send’s properties.
In the Triggered Sends section, click on the Create button.
First, let’s define all the properties:
Name is the name or title of this email message interaction. Use this name to identify the message in the application. Subscribers cannot see the name.
External Key is a unique identifier for the message. Use this value to identify the message when using the API. If you leave this field black, the system will automatically generate a key for this interaction upon saving.
Description is a brief explanation of the email’s content and purpose. Subscribers will not see the description.
Send Classification lets you choose a send classification to use for this interaction.
Override Sender Profile determines whether the interaction uses a different sender profile than indicated in the send classification. If selected, select an override sender profile to use.
Override Delivery Profile determines whether the interaction uses a different delivery profile than indicated in the send classification. If selected, select an override delivery profile to use.
In Associate to Campaign section, you can associate the triggered send with a Marketing Cloud Campaign if you have one – if not, leave this section blank.
In the Content section, find and select the email that you created earlier.
In Subscriber Management, there are two separate sections called List and “Triggered Send” Data Extensions.
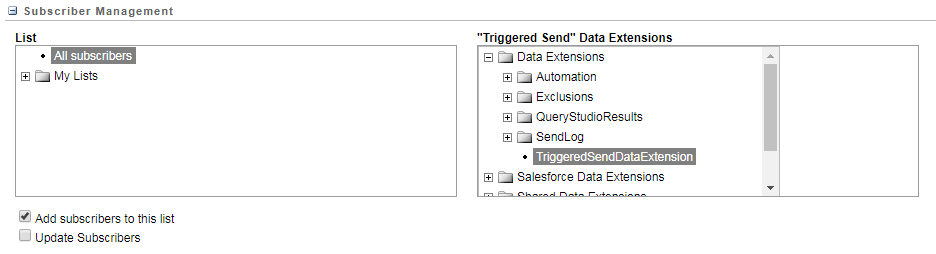
The purpose of the first one, List, is subscriber management. Either choose All Subscribers or a dedicated publication list if you have one. Failing to select a list results in use of the Triggered Send Managed List, a hidden system-defined List, to track status. Avoid this scenario as the Triggered Send Managed List does not support all triggered send-based functionality.
You will also notice two checkboxes under the List section:
Add subscribers to this list determines whether the list accepts new subscriber information of subscribers who trigger this email interaction. If selected, the send adds the subscriber to a selected list if that email address does not already appear on the list. If, for example, you’re using the All Subscribers list to manage subscriber statuses, and the subscriber who triggers this email interaction is not yet there, they will be added there.
Update Subscribers determines whether an existing subscriber’s attributes should be updated if you pass in new data for that subscriber via the API call.
The “Triggered Send” Data Extensions section lets you choose a Triggered Send Data Extension for use with this interaction, which will act as a SendLog, which means it will update with data from requests to trigger this email interaction. In this section, you can only use a data extension created using the TriggeredSendDataExtension template.
Next, in the Select a suppression list section, you can include a suppression list that prevents certain addresses from receiving triggered email messages, select that list. In the Exclusion Management section, you can use a data extension or exclusion script to prevent email from being sent to selected domains or subscribers. Both those sections are optional, so you can leave them blank if you don’t plan to suppress or exclude anyone.
The last section is also optional and you can choose here any additional Send Options: CC Email Address, BCC Email Address, Track all links found within this email, Send as Multipart MIME, Suppress this Send from Reports. There are also some additional options available (create a support case if they haven’t been enabled in your account):
Priority determines how quickly a triggered email is sent:
- High – Queued immediately. Using this setting requires an additional cost.
- Medium – Queued every minute by default. It can take up to 1 minute to send the email.
- Low – Queued every 5 minutes. It can take up to 5 minutes to send the email.
Keyword categorizes the interaction. If you enter a value in this field, that value is available to API calls.
Send Logging, if checked, logs the send in the SendLog data extension.
The last checkbox, Disable API calls to this triggered send when an email build error threshold is reached, sets a threshold of errors before API calls are disabled and the sending process is stopped. By default, the sending process stops when an error occurs while building an email for a subscriber. These errors can occur for several reasons, including an API call passing in bad data or an AMPscript runtime error. However, the system continues to accept API calls even after an error occurs. If you want to use a back-up system when the threshold is reached, this option allows visibility at the API layer to the error.
Once you are finished, click on the Save button located at the top of the page.
For more information on creating Triggered Email Message Interactions, visit this help article.
Start a Message Interaction
Now that you created and saved your interaction, for the whole setup to go live, we need to “start” it.
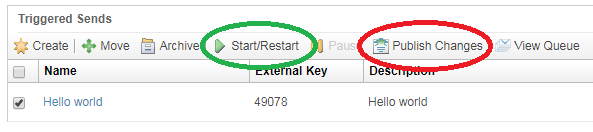
From the list of interactions, check the checkbox next to the one you just created and click on the Start/Restart button. Make a note of the External Key, as you will need it later to be able to send the emails out.
If in the future you would need to make some changes to either email content or the interaction properties, such as Sender Profile or Send Classification, pause the interaction first. When it’s paused, it will cause triggered messages to queue while you make all the changes. Publish the interaction to begin sending emails again.

Congratulations, you’re now ready to trigger the first email!
Triggering the email
In order to trigger the email, we will have to interact with Salesforce Marketing Cloud’s SOAP Web Services API. We won’t get into technical details of interacting with the TriggeredSend object, but rather use a couple of code snippets that you will be able to easily copy and paste and use in your instance of Salesforce Marketing Cloud.
Trigger the email using AMPscript
Go to Web Studio > CloudPages, create a new collection and then create a new Landing Page. You can choose to use the Content Builder when creating the landing page, and for the purpose of this demo, you can use a blank page layout. From the Content Blocks available on the left, drag and drop an HTML block onto the canvas and paste the below code into the HTML editor: [click here to see the code on Github]
In the above script, replace ExternalKey with the external key of the interaction you created earlier and replace email@example.com with your email address. Now click on Schedule/Publish in the right upper corner. The script will only take a couple of seconds to execute and a status message will be displayed. In case it’s OK, you can go ahead and check your inbox, as the email should already be there.
To get into more technical details of the above script and learn how to use a Subscriber Key other than the recipient’s email address, read the following article: Send a triggered email using AMPscript.
Trigger the email using WSProxy
WSProxy is a new object for Server-Side JavaScript, introduced by Salesforce in 2018. Using WSProxy has many advantages, about which you can read in this article, Introducing WSProxy for Salesforce Marketing Cloud. The article also explains the benefits of using WSProxy over pure SSJS for sending triggered emails.
Just like we did before, go to Web Studio > CloudPages, create a new collection and then create a new Landing Page. From the Content Blocks menu, drag and drop an HTML block onto the canvas and paste the below code into the HTML editor: [click here to see the code on Github]
In the above script, replace ExternalKey with the external key of the interaction you created earlier, replace email@example.com with your email address, and either provide a SubscriberKey or use your email as SubscriberKey for this demo. Click on Schedule/Publish in the right upper corner. Again, the script will only take a couple of seconds to execute and a status message will be displayed in JSON format. If it shows "Status":"OK", you can check your inbox for the triggered email.
To get into more technical details of the above script, read the following article: Send a triggered email using WSProxy.
Personalizing triggered emails
Triggered emails, just as any other emails sent from Salesforce Marketing Cloud, can be personalized. In order to add personalization to our email, let’s first pause the Triggered Send Interaction, and then go to Email Studio to edit the email. Let’s add a salutation to our email with the subscriber’s first name. There are two ways in which you can achieve this:
- In the email, include a simple personalization string, for example:
%%firstname%%. This will allow you to pass thefirstnamevalue along with the subscriber’s email address and subscriber key, but you will be required to use a “Triggered Send” Data Extensions for your sends and include a column called “firstname” in that Data Extension. The benefit of using this method is that all sends will be recorded in that particular Data Extension and recipient’s first name will be logged along with their email address and other attributes you choose. - In the salutation, include a personalization string using the AMPscript AttributeValue function, for example:
%%=v(AttributeValue("firstname"))=%%. This will allow you to pass thefirstnamevalue along with the subscriber’s email address and subscriber key, but you won’t be required to use a “Triggered Send” Data Extensions for your sends. The downside of using this solution is that it won’t be logged unless you’re using a regular SendLog which has a column calledfirstnameand you checked the Send Logging option in the Triggered Send Interaction.
After you’ve made all the changes in your email, go back to Email Studio > Interactions > Triggered Sends and first Publish Changes and then Restart the interaction:
Now, let’s go back to our CloudPage and add the additional property, firstname, to our script: [click here to see the code on Github]
Publish the page, and if it shows "Status":"OK", you can check your inbox for the personalized email.
Trigger an email directly from Sales/Service Cloud
NOTE: This feature will only work for Marketing Cloud Connect users and may require Administrator permissions in Sales/Service Cloud.
The process of setting up a Triggered Send in Sales /Service Cloud is similar to using Salesforce Data Entry Event in Journey Builder: we need to choose an object and filter criteria so that the application knows who to send the emails to and under which conditions. Before we configure the Triggered Send, let’s first create a test Campaign in Sales Cloud and activate it, as for the purpose of this demo we will trigger emails to Campaign Member in our test Campaign.
Now let’s make sure that Triggered Sends are enabled for use with Campaign Members in Marketing Cloud Connect. In Sales/Service Cloud, switch to the Salesforce Classic UI, navigate to the Marketing Cloud tab and click on Configure Marketing Cloud Connector. Scroll down to Triggered Sends and in the Enabled Object section, add Campaign Member to the list.
After you save the settings, once again navigate to the Marketing Cloud tab and click on Triggered Sends. In the Triggered Sends Management section, click on New. Enter a Name for your triggered send and choose an Object to use with the Triggered Sends – in this case, a Campaign Member. In Recipient Lookup, choose Lead/Contact and in Filter Criteria, provide the name of the test campaign you created earlier. Next, choose to Trigger send when a new record is created.
Now, let’s find the Email that you created earlier and choose the Send Classification, a Sender Profile if needed and a Triggered Data Extension for logging the send results. Leave the Disable Individual Level Tracking box unchecked, choose immediate Send Time and who the Error Notifications be sent to. Check the box that says I certify all of these people will have opted in and I certify all of these people will have opted in and click on Save.

Now let’s activate the Triggered Send by clicking the Activate button. You’re all set! Now add a Contact or a Lead with your email address to the test Campaign and check your inbox for the Triggered Email.
You will be able to track the results of the Triggered Send in both Sales Cloud and Marketing Cloud: in Sales Cloud, in the Marketing Cloud tab > Triggered Sends and in Marketing Cloud, in Email Studio > Tracking > Triggered Sends.
If you need more information on the above process, refer to this document: Create a Salesforce Triggered Send in Marketing Cloud Connect.
Creating an Apex trigger in Sales Cloud
If upon activating the Triggered Send in Sales/Service cloud you see the following message:
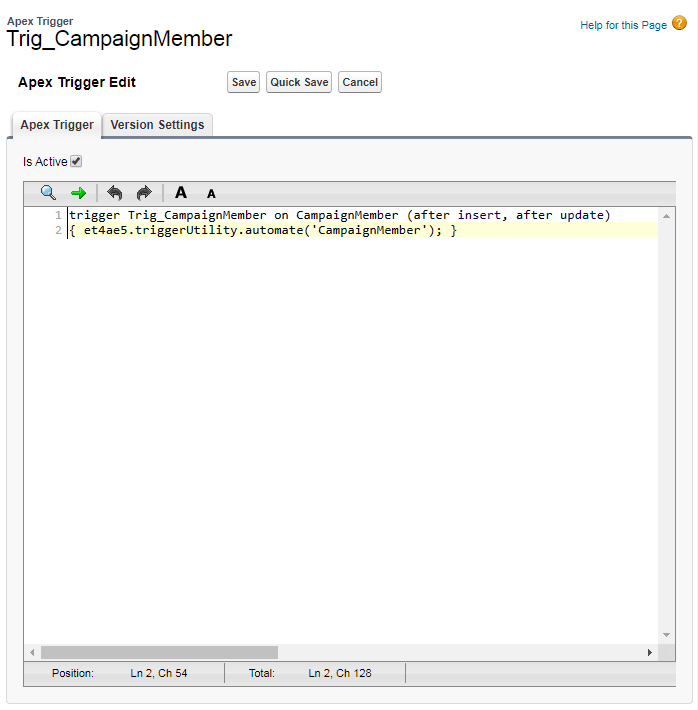
Before activating a triggered send the appropriate Apex Trigger must be created for the following object: CampaignMemberyou will need to create an Apex Trigger for the CampaignMember object.
In Sales/Service Cloud, go to Setup. Under Build, click Customize and choose the relevant object – in this case, choose Campaigns > Campaign Members > Triggers. Click on New to create a new trigger, name it Trig_CampaignMember and paste the following code into the editor: [click here to see the code on Github]
Make sure, that in the Apex Trigger window, Is Active checkbox is checked and save it:
Now go back to the Marketing Cloud tab > Triggered Sends and activate your Triggered Send. Once it’s activated, you can start testing!
If you need more information about creating apex triggers for Triggered sends, read this article: Configure Objects and Triggers.
Questions? Comments?
Leave a comment below or email me at zuzanna@sfmarketing.cloud.

Brilliantly explained article.
Question: If we are triggering the email from Sales/Service cloud, do we still need to create the ‘Triggered Emai Interaction’ in Marketing cloud? I don’t see the External Id is used anywhere. Did I miss something?
Regards,
Manish
LikeLike
Hi Manish,
This is correct, you don’t need to create an interaction in Marketing Cloud for this use case. You are creating it in Sales Cloud, in Marketing Cloud tab > Triggered Sends.
Zuzanna
LikeLiked by 1 person
Thanks for confirming 🙂
LikeLike
hi,
When we setup Triggered Sends, we failed to select ‘Add subscribers to this list’ option and we see contact coming up as duplicated under All Contacts. Is there a way to enable this now so it does not happen on our future sends?
When I check the Subscriber Management, the option is greyed out.
Regards,
Dyan
LikeLike
Hi Zuzanna,
Thank you for providing all the details and codes! Bookmarked the page 🙂
I was wondering if these can be used to set up a Triggered Send on a page outside Cloud Pages (on WordPress for example). If not do you have any recommendations on how to do that?
Thanks!
LikeLike
Great article.
Question: Are we able to change the “from” line on an email for a triggered send based on a particular variable?
We connected our proprietary CRM to SFMC and now want to create triggers based on salesperson behavior.
Say, if Salesperson A clicks a button, we want to do a triggered send that will say “From: Salesperson A ”
How can we accomplish that?
Thank you!
LikeLike
Hi Zuzanna, thanks for sharing these articles, they are very interesting.
I have a doubt about this functionality because the limits described into SFDC documentation is not so clear. If there is a procedure that updates 300000 records on SFDC CRM
on which I defined the trigger seng, It may be a problem? Can you advise me on how to manage this scenario? thank you very much
LikeLike
Hi ,
I have mdmid and uuid both for identifying same record in marketing cloud so if I remove the uuid and have only mdmid for a record what will be the impact in triggered emails.
LikeLike
Hi,
do you know if it is possible, with Ampscript or SSJS, to add to the Triggered e-mail, the CC/BCC recipient, without putting it in the API payload?
Example – I want to put a static BCC, when i”m sending the invoice to the customer.
LikeLike
Hi,
First thank you for this doc. Is very helpful 🙂 .
Second, I have a question. I implemented the trigger send using SSJS and post data to the landing page url and it works very well. the only issue i am having is to get the response in json format after executing CreatItem function. If i execute this using postman for instance, when i do Write(Stringify(res)), it wirtes OK but inside html body. My question is : is there anyway to get rid of the css and html that is added in the response and only have OK?
Thank you
Leny
LikeLike
Pingback: OPT (One-Time Password) flow using Triggered Sends and CloudPages – sfmarketing.cloud
Hey Hi, Thank you for this amazing blog . I have an issue while following blog when Trigger the email using AMPscript we are getting below error :
{“message”:”CreateObject Function is not valid in content. This function is only allowed in non sendable content.\r\n Function: CreateObject(\”TriggeredSend\”)”,”description”:”ExactTarget.OMM.FunctionExecutionException: CreateObject Function is not valid in content. This function is only allowed in non sendable content.\r\n Function: CreateObject(\”TriggeredSend\”)\r\n Error Code: OMM_FUNC_CONTEXT_ERR\r\n – from Jint\r\n\r\n”}.
we have invested so much time on this and coudn’t find any lead can you please help us with this.
LikeLike
Seems like you are trying to run it inside an email, while TS can only be triggered from a CloudPage or Automation
LikeLike
hey Zuzanna Thanks for reply 🙂 , we have used the ampscript inside cloud pages which our thank you page after user updated.PFB
Platform.Load(“Core”,”1.1″);
try{
%%[
VAR @ts, @tsDef, @ts_extkey, @ts_email, @ts_sub, @ts_statusCode, @ts_statusMsg, @errorCode
SET @ts = CreateObject(“TriggeredSend”)
SET @tsDef = CreateObject(“TriggeredSendDefinition”)
SET @ts_extkey = “131588” /* use the external key of the interaction for example SET @ts_extkey = “49078” */
SET @ts_email = “example@example.com” /* provide recipient’s email address */
SetObjectProperty(@tsDef, “CustomerKey”, @ts_extkey)
SetObjectProperty(@ts, “TriggeredSendDefinition”, @tsDef)
SET @ts_sub = CreateObject(“Subscriber”)
SetObjectProperty(@ts_sub, “EmailAddress”, @ts_email)
SetObjectProperty(@ts_sub, “SubscriberKey”, @ts_email)
AddObjectArrayItem(@ts, “Subscribers”, @ts_sub)
Output(InvokeCreate(@ts, @ts_statusMsg, @errorCode))
]%%
} catch(error) {
Write(Stringify(error));
}
Thank you for updating your preference %%=RequestParameter(‘name’)=%%!
LikeLike
Even I am having the same issue though I am using it in a cloud page only.
LikeLike
Hi, Thank you for this amazing blog . I have an issue while following blog when Trigger the email using AMPscript we are getting below error
when I am trying
subscriberKey: CJB-VRT-CST-006-pankajsonkusare.sfdc@gmail.com updateStatusCode: Error
updateStatusMessage: Unable to queue Triggered Send request. There are no valid subscribers.
updateErrorCode: 180008
I have this subscriber in All subscriber List
LikeLike